Food & Drink

I'm Chris - or Christopher - or Mr. Dean - or Master Christopher - or just plain Sir. I'm a self-professed foodie. I love to cook and I take great pleasure in all things edible. My husband and I are relatively new to Portland, Oregon and are enjoying our culinary explorations of the area!


Food is NOT just fuel!


Showing posts with label home cookin'. Show all posts

Thursday, December 8, 2011

Braised Rabbit


It’s funny – rabbit is a delicacy. I remember having it as a kid because people in my family hunted (we also had squirrel, lots of deer, and lots of catfish). The first time I had it again, but in a much more delicate and delicious way, was at Lucien on 1st Avenue (at 1st Street) in NYC. It’s braised and served in a delicious mustard sauce, with some huge papardelle noodles. Simply outstanding!!

A few years back I got a whole fryer rabbit from the online store D’Artagnan and attempted to make a recipe by Tyler Florence. It was okay, but I was convinced I had done something wrong. So last week, I tried it again. I picked up a rabbit from New Seasons and pulled out the same recipe for braised rabbit. Oddly enough every rabbit I’ve ever bought comes with a few of the organs still attached inside. Not sure why, not sure I need to do the research to figure out why. I just tore them out and went along my merry way. You do need to chop up the rabbit – it’s not as simple as a chicken (pre-defined sections). I did remove all 4 legs, and then I simply cut across the spine to make 4 more pieces of rabbit. The back has a lot of delicious meat on it, and it’s best to eat it right off the bone. We ended up with 2 legs each (one with a meaty thigh), and 2 pieces of the back (or loin of rabbit, if you will).

It’s an interesting recipe that calls for lots of black olives – something that truly dismayed me initially. Don’t get me wrong, I love black olives. I have fond memories of the black & green olive plate that was out at every single big family feast as a kid. But I wasn’t sure how they were going to incorporate into the braised rabbit dish. Boy was that hesitation unfounded!!

The key to the recipe is the reduction of the sauce at the end. Really, really reduce it. I mean it needs to be thick and delicious. PLUS I made a little addition to the sauce at the end – 2 Tbl butter, and salt & pepper (based on flavor – taste first to see if it actually needs it). The butter made all the freaking difference in the world. The rabbit was tender and moist, and I piled the pieces up over a mash mixture of potatoes and sweet potatoes. Then I liberally poured the sauce over top and piled up oodles of black olives. Here’s the amazing part – as the sauce reduces, the olives suck up so much flavor! They were outstanding!! Truly a decadent meal, and one that is staying in my collection of recipes!! Seriously, I could not stop gushing over the sauce - it was pure taste bliss!


Tyler Florence suggests a side dish of caramelized radicchio with a salsa verde. I didn’t care for the salsa verde – so I simply caramelized some radicchio (one head of radicchio cut in half, sautéed in some olive oil over low heat for 15 to 20 minutes – flipping often – until caramelized and delicious), and then I drizzled the halves with olive oil & balsamic vinegar.


Braised Rabbit
[NOTE: original calls for 2 rabbits, so this is my ½’d version with my own additions]
1 whole rabbit, cut into thigh sized pieces (as described above)
2 cups flour
1 Tbl minced Thyme
1 Tbl minced Oregano
Salt
Pepper
4 Tbl olive oil
4 cloves garlic
1 bunch fresh Rosemary
1 whole red hot pepper
1 ½ cups black olives
½ bottle white wine
2 – 3 cups chicken stock
Parsley for garnish (oops…I forgot to garnish)

Preheat the oven to 400 degrees F.

In a shallow bowl, combine flour, thyme, oregano, salt and pepper. Dredge the rabbit in the seasoned flour and set aside.

In a large pot (I used my dutch oven), heat the olive oil and fry the garlic, rosemary and pepper to infuse the oil with their flavors. Remove the items from the infused oil and set aside for use later. Place the seasoned rabbit pieces in the pot and cook for 5 – 7 minutes (original says 7 – 10 minutes, but as soon as you get a nice golden brown you’re good to remove the rabbit) on both sides until the meat is golden brown. Add the reserved rosemary, garlic and pepper back into the pot. Add the olives (whole), wine and chicken stock. Move things about a bit just to make sure none of the rabbit is stuck to the bottom. Place the pot in the oven, uncovered, for 40 minutes (original says 30 – I pushed it to 40, use your judgment on the done-ness of the rabbit).

Once the rabbit is cooked through and tender, remove the pieces of rabbit from the pot and set aside (big slotted spoon works best). Over relatively high heat, bring the sauce to a boil and reduce. Reduce it to the point the sauce coats the back of a pan. Another of my favorite tests is to drag your spoon or spatula along the bottom of the pan – if you can see the bottom of the pan for about a second before the sauce falls back into place, it’s thick enough! Pour the sauce over the rabbit and serve!

English Onion Soup with Sage & Cheddar


Who doesn’t love a good onion soup? I remember one specific moment with traditional French Onion Soup – after my Grandfather passed away, for a long while (before I took a job on a cruise ship out here in Portland, OR) I would pick up my Grandma once a week. I’d leave work early, come pick her up in Westerville, take her to the beauty salon to get her hair done, and then we’d have lunch. We rotated lunch spots, but one of her favorites was Max & Erma’s simply because she liked their French Onion Soup. That would be her entire meal – one crock of soup. And we’d giggle about the stringy cheese. Isn’t it wonderful how easily food ties into our memories?

Over the last few years I’ve had a new favorite onion soup adapted from a recipe by The Two Fat Ladies (seriously love them). It was English Onion Soup – and instead of having cheese melted on top, there’s a hunk of Stilton Bleu Cheese crumbled and melted into the soup. It adds amazing flavor to the dish. This time, however, I tried a different version of an English Onion Soup. I found a recipe by Jamie Oliver and thought I’d give it a go. It intrigued me with sage as a large component of the meal – but more was the fact that the melted cheese on top is cheddar…interesting!! And on top of that – a dash of Worcestershire sauce. WHAT? Insanity – I must put it in my mouth!!

The soup itself is traditional, for the most part. Although this recipe did call for the addition of leeks, which I really liked. I traditionally used 3 different types of onions in my onion soup – white, red, and shallots. So the addition of leeks was a nice touch. Yet what made this soup different from the start was the cooking process for the onions. They aren’t just cooked, they’re slow cooked over about an hour – and you need LOTS of onions because they cook down like crazy.

I’ll make the soup with Stilton at some point this winter, I’m sure. But in the meantime, enjoy this version of English Onion Soup! This recipe does say it makes 8 servings. Or 4 BIG servings – when I make a soup it typically becomes the meal.


English Onion Soup
4 Tbl butter (Jamie Oliver calls for “a good knob of butter” – that’s my best guess!)
Handful fresh sage leaves, and 8 leaves reserved for garnish
6 cloves garlic, peeled and sliced
5 red onions, peeled and sliced
3 large white onions, peeled and sliced
3 large shallots, peeled and sliced
3 leeks, trimmed, washed and sliced (original calls for 11 ounces of leeks)
Salt
Pepper
8 cups good quality beef stock (could substitute chicken or vegetable, but why would you?)
8 slices good-quality stale bread, ¾ inch thick
7 ounces freshly grated Cheddar cheese
Worcestershire sauce

Put the butter and 2 glugs of olive oil into the bottom of a large, non-stick pan (I used my big stock pot). Heat them up, and add the sage (I tore the sage by hand into small pieces) and garlic. Once the oil is infused, add the onions, shallots and leeks. Season with salt and pepper, stir everything round again and place a lid over the pot that is slightly ajar to let some of the steam out. Cook slowly for 50 – 60 minutes, stirring often, without coloring the vegetables too much. [Here’s the trick – a good amount of salt added at the beginning helps to keep them from coloring. Medium low heat, and stir them every 8 – 10 minutes to keep them cooking evenly.] During the last 20 minutes of cooking, remove the lid to allow more of the moisture to cook away. The slow-cooking process for the onions gives them an “incredible sweetness and an awesome flavor, so don’t be tempted to speed this up” (says Jamie Oliver).

When the vegetables are cooked, add the stock. Bring to a boil, and then turn the heat down to simmer for 10 – 15 minutes. Turn on your broiler (or oven) and toast your bread on both sides. Taste the soup – correct the seasoning as necessary. When it’s perfect, ladle it into individual serving bowls and place them on a baking dish. Tear the bread and make it fit over the soup in each bowl. Cover the bread with shredded cheddar cheese and drizzle over a little Worcestershire sauce. Into the broiler (or oven) until the cheese melts and begins to bubble.

Saturday, December 3, 2011

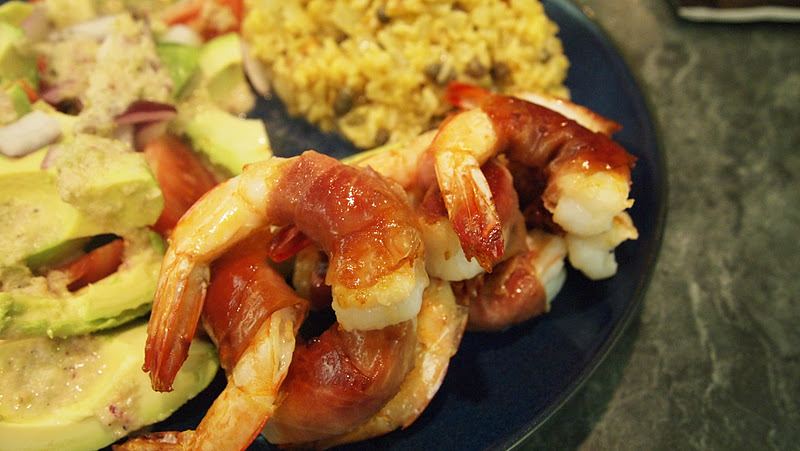
Prosciutto-wrapped Shrimp (and sides)


'Inoteca on the Lower East Side of Manhattan inspired me to make this simple and delicious dish at home. So every now and again, when I walk past the seafood counter and see some AMAZING shrimp, I can't help myself. I truly wish I could find real prawns, or better yet some langoustines - but alas, those are never anywhere to be found. However the other day at New Seasons Market I was scoping out the shrimp and started hopping in delight. They had a HUGE pile of hefty shrimp that had literally been brought in from the ocean that morning. After I picked myself up off the floor (come on, I'm not overreacting - even in the best places you almost always see that the shrimp had been previously frozen), I got 20 massive shrimp for dinner. Next, a quarter pound of thinly sliced prosciutto and dinner was shaping up!


I won't even bother with a recipe, it's so darn easy. The shrimp were fresh so they needed to be cleaned. This took about 3 times longer than it did to cook the entire meal, but that's okay. I was in my happy place in the kitchen. :) If you have never cleaned your own shrimp, it's not that difficult - just a bit time-consuming. They always come without the heads, so no worries there. You simply need to peel off the shell and legs - but absolutely leave the tail on. Then with a sharp knife, slice down the back of the shrimp (not too deep, maybe 1/4 inch, if that). Your incision will reveal a dark line inside the shrimp. That's the digest tract. Simply scrape it out, or pull it out - just get rid of it. Then move on to the next shrimp. Give them a good rinse before going on to the next step. Carefully pull apart your thin slices of prosciutto and wrap one (or in most cases, 1/2 of one) piece snugly around the meat of the shrimp. Once they are all wrapped, heat a little olive oil in a pan over medium-high heat. Lay the shrimp in the hot pan making sure they are all in contact with the pan. 3 minutes, turn, 2 - 3 minutes, until the shrimp are cooked through and the prosciutto gets a little crispy on the outside. Absolutely delicious.


I knew I'd be making a rice dish as a side - it was simply some sauteed onions and garlic with capers and black pepper mixed with the brown rice. However the other side dish was a bit more fun. Raw slices of tomato and avocado drizzled in a bit of a salsa verde of sorts. I took some gorgeous tomatillos, cut them up along with some garlic, lime, red onion, salt & pepper. This all went into the blender with some olive oil. Once blended, I simply spooned it out over the raw veggies. Scrumptious!!


A note about tomatillos if you're not familiar with them. They're delicious! That's not all I was going to say, though. Sometimes I cut them up and heat them in a pan with salt, pepper & oil and they become a great base for a salsa. They are versatile and so green in flavor. The papery substance surrounding them is not edible, so be sure to remove it. And then wash them thoroughly - there's a layer of stickiness that surrounds the flesh and you should remove it. Otherwise, cut up and enjoy!

Saturday, November 26, 2011

Polish Kielbasa & Cabbage


I picked up some really nice Polish Kielbasa at the market last week. I wasn't quite sure what I was going to do with it - likely something simple. keith, however, had other plans for the sausage. He found an authentic Polish recipe using the sausage, cabbage and potatoes - and then did his own twist. He used 1/2 potatoes and 1/2 yams (really nice touch that added a bit of sweetness to the dish). I know there was some horseradish in there, and some stock...but aside from that he wouldn't let me into the kitchen to see what he was doing. The end result, however, was wonderful - thick, hearty and comforting. Perfect for a fall evening! So I encouraged him to write down his own version of the recipe (he has a folder with recipes he does really well, and over the years we've been together the number of recipes - and the quality of the recipes - has greatly increased). So while I can't give you the recipe, I can tell you it was a delicious Polish meal!

Sunchokes


I love it when I see sunchokes in the store - they aren't available often, so when they are I grab a bag full! Sunchokes, also called Jerusalem artichokes, are the tuber of a type of sunflower. Amazingly I recently discovered that nearly 90% of all sunchokes in Germany go towards the production of a liquor called Topinambur. I must find Topinambur.

Sunchokes are beautifully ugly on the outside, and can be prepared in any traditional recipe calling for root vegetables. I would guess they make a great mash! They have a slightly nutty flavor that is really quite pleasing. Often I've roasted them, but this time I tried something different.

I peeled the sunchokes - I would think the skin is fine to eat if you scrub them clean. However I was going for a visual so I peeled them and sliced them. And like potatoes or artichokes, they will begin to "rust" when exposed to the air for a short time. In order to stop that, simply placed the peeled sunchokes in some acidulated water - in this case I had a bowl with 2-3 cups of cold water and I squeezed 1/2 a lemon into the bowl. Drop the sunchokes in the water and leave them there until you're ready to use them.


I decided to pan fry the sunchokes in some brown butter. 4 Tbl butter, heated over medium heat until it begins to take on a golden color - don't let it get too brown at first, since you still need to cook the sunchokes. Drop the strained sunchokes into the pan and cook for 10 - 15 minutes, or until they get tender.


I thought the finished sunchokes in brown butter looked a lot like water chestnuts. :) But they were delicious - I pulled them off the heat when they were still just a tiny bit firm in the middle - the texture is delicious. So here's to sunchokes!

Friday, November 25, 2011

Thanksgiving Feast: Turducken, Rye Bread Stuffing, Yams stuffed with Apples


Thanksgiving has come and gone, but the leftovers linger on. Secretly I always am suspicious of Thanksgiving when it rolls around. It celebrates an iconic event that likely never happened, and only became a national holiday because Lincoln needed a way to make people come together. But still, I do love the idea of the holiday - giving thanks for the wonders in our lives.

I gave thanks for my wonderful husband, who has been the most important person in my life for nearly the last 8 years. I gave thanks for my adoring dog Max who has been the biggest hairy ball of unconditional love I could have ever hoped for during the last 9 1/2 years. I gave thanks for our friends, our families, the world we've created together and the future that is laid out before us. It's been a good life all in all. :)

Now on to the food. So the theme was "stuffed" in honor of the pre-combined turducken I found at New Seasons. Typically a turducken is huge - a 4 - 5 lb chicken (boneless) inside a 10 lb duck (boneless) inside a 25 lb turkey (whole) - kind of like meat stuffing. In THIS case all three birds were boneless so it was more like a turducken roll - fine by me! Much less cooking time and easier to carve.


I needed "stuffed" things to go with the theme. Immediately I thought of apple-stuffed yams. No idea why, it's not something I've ever made before. But yams can really get along with sweet spices, so I thought this would be a natural pairing. I baked the yams until nearly done (about an hour), and pulled them out to cool. I figured the easiest thing to do was to treat them like twice-baked potatoes. So I cut each in half lengthwise and scooped out most of the yam flesh into a bowl. That got mashed with just some butter, salt & pepper and a little fresh ground nutmeg. Meanwhile, in a small pan on the stove I had 2 apples (peeled, cored, and cut up into 1/2" pieces). They were simmering in some butter (3 Tbl), brown sugar (1/2 C), fresh nutmeg (1/2 tsp), cinnamon (1/2 tsp), and allspice (1/2 tsp). I also added some salt (1 tsp) and a touch of pepper (pinch). These cooked for maybe 15 - 20 minutes, stirred often, until the apples were REALLY tender and there was some delicious juice. [Side note - this sugary, sweet juice was the perfect pre-dinner shot for my husband...if you like sweet things.]  I piled the apples into the yam shells evenly, and then covered them with the mashed yams. I made it easy on myself and put the mashed yams in a plastic bag, cut off the tip and evenly distributed the mixture over each. These went back in the oven (350 degrees) for about 1/2 hour to make sure everything was hot and delicious.


The turducken was easy - in a pan, 350 degrees, covered for 2 hours (this was nearly a 6 lb. collection of birds), then uncovered for 45 minutes or so until the internal temperature reaches 165 degrees. I let it rest for a bit and then just sliced it right up. It was the taste explosion I was hoping for, but what was interesting was the fat that usually drips away when you're cooking a chicken or (especially) a duck is trapped inside the turkey meat. So yeah, that was a really nice touch! And the cranberry sauce I made went wonderfully with the meat!


The stuffing - I have to say this was the star of the meal, as far as I'm concerned. I love it when I make something up and it really comes together. And for some reason I always use rye bread when I'm making a homemade stuffing. I love the earthy flavor it brings to a dish - it compliments root vegetables like celery and carrots quite nicely. The recipe for this is below - warning, there's a lot of butter in this stuffing but it is damn well worth it. :) Initially for the "stuffed" theme I wanted to make stuffing balls that had a cranberry sauce center. Yeah, that wasn't going to work. So I cheated and when I plated the stuffing I made a little well and piled some cranberry sauce in the center. It worked!


And let us not forget the cocktail. How to do a "stuffed" cocktail? I had lots of suggestions - three cocktails in one (in honor of the turducken); something with jello shots...so on. Instead I tried something different. I emptied one of our fantastic silicon ice cube trays and filled them with a mixture of cranberry and lime juices, and then added a spoonful pomegranate seeds in each one. When they were frozen the seeds were on top and they were quite beautiful. So for the drink - SO simple. 2 ounces of cucumber vodka (Pearl is excellent) and 2 ice cubes. That's it! The ice cubes represented the "stuffed" part of the cocktail, and they immediately begin to melt. So your drink is constantly transforming in flavor, and at the end you get to eat the seeds. Touch of brilliance in such a simple way. I'm so modest.


So all in all, great evening and wonderful food. I was so glad I was able to get out of my recent funk quick enough to pull everything together. I love experimenting with new foods on Thanksgiving, and I love trying to top myself every year. I hope you all had a wonderful holiday as well!!

Rye Bread & Leek Stuffing
1 small onion, chopped
1 large leek, cleaned & chopped
1 large carrot, chopped
2 stalks celery, chopped
3 cloves garlic, thinly sliced
8 slices thick rye bread, crust removed, cut into 1" pieces
1 stick butter (I KNOW!!)
2 tsp fresh thyme leaves
2 C chicken stock
Salt
Fresh ground pepper

Heat the oven to 350 degrees. In a large pan (I used my dutch oven) heat 6 Tbl of butter (1 stick has 8 Tbl, reserve the other 2 for later). Once melted add the onion, leek, carrot, celery, garlic, thyme and salt & pepper to taste. Cook, stirring often, until the vegetables are softened.

While the vegetables are cooking, spread the pieces of rye bread out on a sheet pan and bake for 10 - 15 minutes until toasted. Remove and set aside.

When the vegetables have softened, add the chicken stock and bring the mixture up to a bubble. Add the toasted bread and mix thoroughly. Transfer to a baking dish and dot the top with the remaining 2 Tbl. of butter. Bake for 30 - 45 minutes until the top is a little crusty/crunchy and delicious.


Chris' Cranberry & Hazelnut Sauce
1 package fresh cranberries
1/2 C sugar
1 C orange juice
1 C roasted hazelnuts

Quickly roast the hazelnuts in a hot, dry pan for 5 - 8 minutes stirring often. This helps release some of the oils and enhances the flavor. Pour onto a cutting board once heated through and chop.

In a pot over medium heat add the cranberries, sugar and orange juice. Stir to dissolve the sugar, and then cook the cranberries for 15 - 20 minutes, stirring often, until the cranberries have all popped open and the mixture begins to thicken. Add the chopped hazelnuts and reduce the heat to medium-low. Cook for another 10 - 15 minutes or until the mixture has thickened to your desired texture.

Tuesday, November 15, 2011

Chicken Meatball and Cheese Tortellini Soup


I found this recipe in the book "Dinner At My Place" by Tyler Florence. I was searching for something comforting - something to soothe me to the core. This certainly hit the nail on the head.

Around this time of year, like everyone else, I begin craving soups and stews. As it begins to get colder I transition into roasts, and big, slow-cooked cuts of meat (as my friend Mary-Ellen recently said "I'd eat a unicorn if it were slow-cooked properly"). This delicious meal had the meatiness I wanted (chicken meatballs) and the warmth of a really good soup.

I made a TON of meatballs. Seriously, so many. We had some as appetizers before the meal. And for all my good intentions of saving 2 bowls of soup as leftovers...I ate out the meatballs, and never got around to finishing off the soup. :)

And truth be told - I made the meatballs the day before and put them in the refrigerator overnight. That worked just fine and gave me less to do as I was assembling the soup.


Chicken Meatball and Cheese Tortellini Soup

for the meatballs:
4 links organic chicken-apple sausage (instead, I used 1 1/2 lbs ground chicken meat)
1/2 C bread crumbs
1/2 C whole milk (I used half & half)
1 egg
2 Tbl chopped fresh Italian parsley
1/4 C grated Parmigiano-Reggiano cheese, plus 2 Tbl for sprinkling
Salt
Fresh ground black pepper
Extra-virgin olive oil

for the soup:
Extra-virgin olive oil
3 garlic cloves, peeled & smashed
4 fresh thyme sprigs
2 large carrots, cut into circles
1 medium onion, diced
2 ribs celery, diced
salt
2 quarts reduced-sodium chicken broth
4 black peppercorns
2 Tbl chopped fresh Italian parsley
1 bay leaf
1 lb. fresh refrigerated or frozen cheese tortellini, thawed
1/4 C finely chopped Italian parsley
Grated Parmigiano-Reggiano cheese
Fresh parsley sprigs, for garnish
1 crusty baguette, to serve with the soup

Preheat the oven to 375 degrees. Prepare meatballs by combing loose ground chicken meat (discard casings if using links), bread crumbs, milk, egg, parsley, and 1/4 C grated cheese in a large mixing bowl. Season with salt & pepper, then mix until fully combined. Using a small ice cream scoop (or a large spoon), make balls and set on a roasting tray. Drizzle lightly with olive oil, and sprinkle with 2 Tbl. grated cheese. Roast for 15 - 20 minutes, until golden brown and caramelized.

While the meatballs are cooking, prepare the soup. Set a large stockpot over medium heat. Add a 2-count of oil (about 2 Tbl), the garlic and the thyme. Gently saute until fragrant, about 2 minutes. Add carrot, onion, and celery. Season with salt and cook for 5 - 7 minutes. Pour in chicken broth and add peppercorns, 2 Tbl. parsley, and bay leaf. Bring to a boil and then reduce heat and simmer for 25 minutes.

Once meatballs are cooked, scrape them into the pot of chicken soup and add tortellini. Bring to a boil and cook for 2 - 3 minutes to allow the flavors to come together. Remove peppercorns and bay leaf. Season with salt and pepper to taste, and serve. Sprinkle with parsley and grated cheese. Garnish each bowl with a parsley sprig and serve with torn pieces of crusty bread.

Monday, November 14, 2011

Mushrooms


Any vegetarian will tell you that mushrooms cooked right give them the same mouth and tooth feel as tender meat. Why vegetarians want things to feel like meat in their mouths, I'll never understand.

But I LOVE mushrooms. One of my favorite side dishes is simply sauteed shiitake mushrooms, with some butter, olive oil and a small palm-full of crushed herbs de Provence. Cook them over medium-high heat until they get deliciously tender all the way through. In this case, all I did was remove the stems. Sometimes I leave them on (but cut off the very end - tends to get tough), and sometimes I slice them. So warm and comforting...just like meat!

Sunday, November 13, 2011

Chicken Corn Tortilla Soup


I know I've mentioned it before...but this soup is so darn comforting I can't help myself. I start in a very old-school way - boil an entire chicken. That's right, I chop up an entire chicken and it goes into a pot. I also throw in some savories: thyme, peppercorn, salt, onion, carrot, celery. And I boil it until the chicken is cooked completely through. The result - cooked chicken, and a stock I can use for the soup. I know, you're thinking the chicken won't have any flavor because it's been boiled. Wrong-o, my friend. :)


Next step is to shred the chicken - you want it nicely shredded and make sure to discard all skin and bones. In a new pot, heat up some olive oil and start cooking the vegetables: onions, carrots & celery with a little salt until they begin to soften. Add chopped thyme, chopped garlic, and 1 - 2 chopped jalapenos.


Here's the fun part - in the past I would often use a couple of cans of creamed corn. This time, I DID use one small can of creamed corn (mostly to add some sweetness and for some texture), but I also cut kernels off of 3 fresh cobs of corn. Holy crap I love fresh corn. Once the vegetables have begun to soften, throw in the corn, creamed corn, and the chicken. Mix this through and then add enough of the reserved stock to cover everything by 1 - 2 inches (depending on how big of a pot you have). Season with salt & pepper to taste, and bring to a bubble. At that point, reduce the heat so that it stays at a simmer for about 1/2 hour.

In the meantime, heat up some oil in a pan (I used peanut oil) and fry small strips of corn tortillas, turning once. They will darken a bit, and get crispy. I make a big pile of these because halfway through cooking of the soup, I like to throw in a big handful. They get really soft, almost like noodles, and add a really nice texture to the soup.


Once the soup is finished, ladle it out into big soup bowls (make sure you tasted it for seasoning first). Add a pile of fried corn tortilla strips to the top and you're ready to eat!

Sunday, October 9, 2011

Pasta Bake


Pasta bakes are great fun, and so easy to put together. keith really wanted some hearty pasta the other night, so we went off to the market to pick up some ingredients. I didn't keep track of everything, as I let him make the pasta (after I set up his mis en place). Comforting & delicious, it's like a big food hug. he cooked a pound of ground sirloin along with some onions, garlic, mushrooms, and red bell pepper. To this he added a big can of whole, peeled tomatoes and the sauce, as well as one small can of plain tomato sauce. There was likely some thyme, oregano and basil thrown in there at some point (really, I think I was playing xbox and just running into the kitchen when he had a question...I'm guessing). As this was cooking, he boiled some farfalle pasta (2 minutes UNDER what it suggests on the box). Once the meat mixture was bubbling and delicious, he added a big handful of chopped pepperoni and poured the whole thing into a big bowl. He added 2 handfuls of shredded mozzarella cheese and about a cup of ricotta cheese. Then he added the pasta, mixed it all together and poured it into a baking dish. The whole thing was covered with a nice layer of mozzarella and parmesan cheeses, and placed in a 375 degree oven for about 30 - 45 minutes, until golden brown on top and bubbling.

Fall has arrived at our house.

Breakfast Sandwich


This is a meal that keith learned from his mom - in fact the recipe is part of a collection of recipes she gave him when he moved out of the house so many years ago. It's become a bit of a guilty weekend pleasure for me, and keith makes it every so often (not too often...it's damn heavy, but oh so delicious!). And it's wonderfully simple to make. Pillsbury flaky biscuits in a can; a package of breakfast sausage (bulk, not links, formed into small patties), and sharp cheddar cheese. Bake the biscuits and cut them in half. Cook the sausage until it's completely done, then toss it in the microwave for just a few seconds to help melt the cheddar (you could do this in the pan during the last few minutes of cooking as well, but the microwave is easy). That's all there is to it!

Tacos


I suddenly was craving tacos. When I mentioned that to my husband, he offered to make some for dinner...how sweet! Off to the market for all of the ingredients. And this time, he was going to attempt it without one of those taco seasoning packets (not because he's all that excited about cooking, but because he knows I prefer it that way...still so sweet!).

We, my husband and I, have come to an understanding when he cooks. I stay out of the kitchen as much as possible during the actual event - and for a short period after. Simply because often times the mess brings out my neurotic side and I scurry around behind him cleaning up all of the stuff he's dropped or discarded. I  can't help myself, the kitchen is my domain and I like it to be organized, efficient, and clean! But I've learned to relax. Now I just let him do his own messy thing without a complaint. Don't get me wrong, I often peek over at him mixing something and watch a glop hit the floor. Instead of getting frustrated, I giggle. And then I tell Max to go into the kitchen to help daddy. Max loves it when keith cooks - lots more stuff hits the floor, and as everyone knows, if it hits the floor it belongs to the dog.

All that being said, the tacos were excellent. he always goes all out as well with the toppings: fresh chopped green leaf lettuce, diced raw tomatoes, chopped onions for me, shredded cheddar cheese, salsa, sour cream, and hot sauce (again, for me). I've been favoring this awesome habanero hot sauce given to me by Kevin as a 'welcome to Portland' gift when we first arrived. Intense heat with a great amount of flavor.


One note about tacos - the shells annoy me. I admit it. It's hard to fill them, they always fall over and all the contents explode from inside. This time we thought we'd try the flat bottom tacos. Great idea, right? They'll stay upright! And they do indeed stay upright. However the meat mixture is wet, and within minutes the bottom of the taco is a soggy mess, nearly impossible to get from plate to mouth without making a mess. Alas, back to the originals next time. But still...damn tasty!

Tuesday, October 4, 2011

Roman-Style Lamb


I'm a sucker for a good lamb dish - especially as cooler weather starts rolling in. Typically I make some sort of stew or thick dish with chunks of lamb shoulder - OR I simply roast a whole shoulder. I was flipping through Molto Italiano by Mario Batali and ran across a recipe for Roman-Style lamb. Of course he calls for a delicious and tender spring lamb, but alas, it's fall! So I went ahead with the dish anyway...such a rebel.

What I found really interesting as I was making this dish is the amount of liquid that is added, and that it's expected to basically all cook away. About halfway through the final stage of the recipe (cooking out 2 cups of wine) I said to keith "I'm not sure this is going to work." He walked up behind me and whispered in my ear "trust in Mario." :) So I did.

With my trust firmly reinstated I forged ahead, stirring often and adding more and more wine as it cooked away. Lo and behold I was knocked over with the flavor of the gorgeously cooked pieces of lamb. I think I may have cut them a little too small, but as some of the pieces broke apart slightly in the cooking, they became intensely flavored and delicious. And while I opted for a boneless shoulder instead of the bone-in version he suggests, I couldn't have been more pleased. This lamb dish just sky-rocketed to the top of my favorites. I can see this becoming a cool weather staple in this house - and something I'll cook for friends and family. Nothing says love like an explosion of flavor!

I did have one missing component that I'm sure will add even more depth to the flavor: anchovies. Mario uses them as seasoning rather than to add a distinctive fish flavor. I completely forgot to buy some at the store. In my frustration over forgetting the anchovies I did add a splash of fish sauce and a little extra salt (components I figured would have been reminiscent of anchovies) and it seemed to work just fine. Next time I'll do the anchovies - I'm sure they melt into the dish and you wouldn't even know they were there except for a slightly more complex flavor to the dish.

So as the temperature begins to descend, I whole-heartedly recommend this lamb dish. And make lots - the leftovers are just as good!! I served the lamb with some mashed purple potatoes - great pairing, if a bit heavy.

Roman-Style Lamb, by Mario Batali from "Molto Italiano"
5 Tbl extra virgin olive oil
5 cloves garlic, 1 finely chopped, 4 left whole
4 pounds lamb shoulder (he calls for bone in), cut into 2-inch pieces (for bone in, you'd need a butcher to do this)
2 sprigs rosemary, leaves only
4 salt-packed anchovies, filleted, rinsed and drained
1/2 C white wine vinegar
1 Tbl salt, plus more to taste
2 C dry white wine
1 Tbl parsley, chiffonade
12 fresh mint leaves

In a large deep heavy-bottomed skillet (I used my dutch oven and it worked great), combine the olive oil and whole garlic cloves and saute over medium heat until the garlic begins to brown, about 5 minutes. Remove the garlic and set aside. Increase the heat to medium-high, add the lamb, working in batches to avoid overcrowding the pan, and brown well on all sides. Transfer to a shallow bowl.

Meanwhile, in a small bowl, combine the rosemary, anchovies, vinegar, salt and chopped garlic and mix well. Add the vinegar mixture to the meat, tossing to coat, and return to the pan. Reduce the heat to medium-low and cook slowly until the vinegar evaporates, about 10 minutes. Add half of the wine and the reserved whole garlic cloves and cook until the meat is tender, about 1 hour. As the wine evaporates, add the remaining wine as needed.

Transfer the lamb to warmed plates, sprinkle with parsley and mint, and serve immediately.

Saturday, October 1, 2011

Roasted Chicken


There is something so comforting about a whole roasted chicken. I read once that there are a few simple things to prepare that can tell you if someone is a good cook: eggs (either just a simple fried egg, or an omelet), and a roasted chicken. They're simple, but they're also very easy to get wrong.

Typically when I roast a chicken there are a few things I almost always do. I never let the bird sit directly in the pan - first, because a lot of fat drips out and I don't want it sitting in it; second, because I don't want any part of the bird to cook faster than another. So I always use a natural lift - sometimes celery, or lots of whole garlic. This time I used whole carrots and quarters of an onion. If you end up using the drippings in the pan to make a sauce, these also add great flavor to the sauce. And they do serve as aromatics, adding some flavor to the bird.

Inside the chicken - I always stuff it with aromatics. Often herbs are used, but this time I halved a couple of shallots and threw in some whole garlic cloves (skin and all, you don't eat it so don't go through the trouble of peeling it). Apples work great, or onions and thyme. Anything you like that will add moisture and flavor to the bird. I've only ever used a stuffing inside a bird once - generally I don't do it (turkeys, ducks, etc.) because the bread of a stuffing helps dry out the bird. Plus if it isn't cooked exactly right, you run the risk of contaminated stuffing. I did it once, like I said, inside some ducks. It was a prune & apple stuffing - sounds odd, but it was outstanding. And lots of it - it was for Thanksgiving a few years back and with six people I had 3 ducks going at once!


When you're roasting a chicken, there are a couple of things to keep in mind. Simple is great. Most times I just rub in some olive oil all over the bird and then sprinkle with salt & pepper. This time I used a savory butter (thyme, salt & pepper) which I not only spread generously all around the bird, but I pushed up under the skin of the breast and legs. Always remember to prep the bird - this one was an amazingly fresh bird from a local farm, so I had to even remove a few lingering feathers. I always pull the wing tips back under the bird to keep them from burning. And I also always truss the legs - simple tie to close the legs over the opening of the cavity. This just helps ensure the legs cook evenly and not too quickly.

Obviously cooking time depends on the size of the bird. However I always start with a HOT oven - often 500 degrees. I get it pre-heated, throw the bird in, and immediately drop the temperature to 350. This helps get a sear on the skin of the bird, and aids in browning and crispiness. Mine cooked for about an hour. If it starts to get too brown, simply pull it out and cover the breast with some aluminum foil.

Doneness - I always recommend a meat thermometer. But sometimes you just don't have one handy, so a good rule of thumb is to pierce the bird in a meaty place (breast is good for this - deep pierce), if the liquid that runs out is clear and/or yellow with NO pink or red in it, then the bird is likely done.

I'm still working on my carving skills. I did pretty good this time, except for the second leg. I ended up yanking off all of the meat and leaving the leg intact on the carcass. Oh well, that was keith's plate. :)

Bratwurst


I love a good bratwurst. Maybe it's the shape. :)

I grabbed some bratwurst at the store, and managed to find some great fall corn as well. So everything went on the grill. Soak the corn for a few minutes in cold water, and then onto the top rack for about 1/2 hour. I love corn this way because there's no need for those damn corn holder spiky things that I used growing up (when we ONLY boiled our corn - which I never, never, never, ever, never, ever do anymore - roast in the oven, or grill). You simply pull back the husk, slip off the bunch of corn hair (it slides off so easily when the corn is done), and you have a natural handle from the husk! Bathe them in butter and you're good to go!

As for the brats - I sometimes simmer them in some beer to inject a little more flavor. This time I simply plopped them on the grill and cooked until done. I sauteed some onions and peppers to pile on top of the brats. And for finishing touches: coarse stone ground mustard and provolone cheese. Delicious!

Root Vegetables


I cut up and roasted a bunch of root vegetables the other night as a side dish. So simple and delicious. Chop them all into roughly the same size (after peeling, etc.), coat it all in some olive oil and sprinkle with salt & pepper. 375 degrees for 30 - 45 minutes until they start to turn golden brown and get soft to the touch.

Friday, September 30, 2011

Grilled Lamb Rib Chops


There's something about lamb...I just love it. And for years I would stick to the leg of lamb only. I'm way beyond that now. Don't get me wrong, the leg is gorgeous and delicious - and makes a really awesome looking roasting meat at the dinner table. But for roasting now I'm all about the shoulder. It's just a bit more delicious, and takes flavor really well. However for quick lamb, I love me some rib chops!!


Sometimes meat departments at stores will have pre-cut rib chops, but I'm more prone to buy a whole rack of lamb than individual chops. I like cutting the chops myself, knowing that everything being done to the chops is by my hand from the moment I get that rack. And some of my classic flavors that I add to lamb are typically rosemary & garlic. You can't go wrong piercing a shoulder all over & shoving whole garlic cloves into the meat before roasting. And if you buy boneless, wrap that baby around a big bunch of rosemary before roasting. I'm hungry.


I recall a pistachio tapenade that I once made for lamb rib chops that was outstanding, however I typically like the lamb (in chop form) to stand on it's own. So this time around I went simple - really simple. Olive oil, lemon juice, salt, pepper and Herbs de Provence. If you've not cooked with Herbs de Provence, definitely try it. It's a French mixture of herbs that includes savory things like marjoram, rosemary, basil, oregano, fennel, lavender and coriander. It's the perfect addition to a lamb rib chop.


Alongside the rib chops, I opted for some fresh grilled vegetables. I found some really nice end of the summer zucchini, and even some delicious little yellow tomatoes. I've really gotten into grilled tomatoes - always cherry sized or so. For all of the vegetables, I sliced them (peppers, zucchini, etc. - not the tomatoes, they stay whole), and piled them into a bowl. I poured over some olive oil, and salt & pepper and mixed them to coat everything. And then onto the skewers. Peppers & zucchini took about the same time to cook, and I had them on the main grill over moderate heat. The tomatoes need indirect or low heat so they don't burst and release all of their juices. I cook them on the top rack, slowly, and once the skin starts to blister slightly or pull apart, I pull them off. They get warmed through and are delicious.

Grilled Lamb Rib Chops
1 rack of lamb, or 4-6 rib chops per person
Juice of 2 lemons
1/2 cup olive oil
2 Tbl. Herbs de Provence
Salt
Pepper

Combine the lemon juice and the olive oil in a bowl, and pour half of it over your lamb rib chops. Make sure each is coated in the mixture (you can reserve some of this oil mixture to baste the chops while they are grilling). Sprinkle salt & pepper over the chops. Sprinkle the Herbs de Provence over both sides of the chops (reserving about 1/2 tsp. for later). Over medium-high heat, grill the chops, about 4-6 minutes each side, until done. Eat with your fingers.

Tuesday, September 20, 2011

Chicken Wrapped in Pancetta with Leeks and Thyme


I adapted this recipe from one I found in "Cooking with Jamie" by Jamie Oliver. His recipe calls for just using leeks - I wanted a bit more than that, so I also threw in some chopped fennel and sliced garlic. The pancetta crisps up and keeps the chicken really moist and delicious, while the vegetables get soft and flavorful. It's a really simple dish to make, and takes so little time! Which leaves plenty of time to decide which cocktail goes best with leeks and thyme!

Chicken Wrapped in Pancetta with Leeks and Thyme by Jamie Oliver with my adjustments
1 - 2 chicken breasts per person (depending on their size), skinless & boneless
3 leeks, thoroughly washed (outer leaves removed) and sliced into 1/4 inch pieces
1 bulb fennel, cut into 1/4 inch pieces
3 cloves garlic, sliced
Olive oil
Knob of butter (I actually used some white truffle butter that added tons of flavor - about 3 Tbl)
Salt
Pepper
Glug of white wine (about 1/4 cup)
2 - 4 sprigs of Thyme
6 - 8 slices pancetta

Preheat the oven to 400 degrees. Layer a baking sheet with aluminum foil, place the chicken breasts in the center and cover with pancetta slices. In a bowl, combine the leeks, fennel, garlic, olive oil (3 Tbl.), salt & pepper to taste, and white wine. Mix thoroughly and then spread the mixture out around the chicken - make sure to pour all the liquid from the bowl over the mixture. Break up your butter into 3 or 4 pieces and arrange them around the vegetables.

Fold the foil over the vegetables slightly so that they don't burn in the oven. Drizzle a little olive oil over the chicken, and lay the thyme sprigs on top. Into the oven for about 25 - 35 minutes.

Denver Omelet a la keith


For the past couple of weekends I would go to make breakfast and keith would say "are we having a Denver Omelet?" My response was always "when have I ever made a Denver Omelet?" So finally I said "if you want one, you have to make it." Always chipper in the mornings, am I. :)

Truth be told I'm not a big fan of making omelets - mostly because I just don't have the right pans for it. I need some good, simple, non-stick pans that will aid me in omelet making. So instead I tend to always make elaborate scrambles and delicious frittatas. Nothing wrong with that. Yet keith was on a mission, so we bought ham, green bell peppers, onions, and cheddar cheese. He marched downstairs into the kitchen, iPhone in hand, ready to conquer a Denver Omelet. And then he asked "where are the baking dishes?"


Perplexed, I pulled out the two round cake pans and quickly exited the kitchen. He got all of his ingredients ready (mise en place - there are some things I simply insist on in my kitchen), and cooked the vegetables before combing everything together and pouring it into the pan. Essentially he was making a quiche without the crust - and it was delicious!! Light & fluffy with lots of flavor. A wonderful start to the day.

And now that he's proven he can tackle such a lovely & savory breakfast, he might just be making breakfast more often. :) And while he got a bit embarrassed when I snapped a pic of him holding his iPhone (to read the directions of the recipe he located online), I love that photo - it's so cute. And so keith. :)

Lasagna


It's becoming that time of year when my mind begins wandering to hearty, comfort foods. Last night I made chili (no photos, alas), and at the end of last week I made a huge lasagna. Lasagna is one of those things that changes every single time I make it. Not only based on what I have available to put IN the lasagna, but also on my mood and tastes of the moment. So while I only have this photo of the finished product, I'll give you a walk-through of the layers from the bottom up.

1. Bottom of the pan - 1/4 C olive oil and half of a small can of tomato sauce to keep everything from sticking.
2. Noodles - for some reason I bought the smaller noodles (length) so had to be creative with arrangement. It still worked out just fine.
3. Meat - I cooked a pound of beef and added some garlic (sliced) and a can of whole, peeled tomatoes (with the juice) that I broke up using my hands. Added some salt, pepper, and some fresh thyme and 1 C tomato sauce and let the mixture cook and reduce by 1/3.
4. Noodles
5. Vegetables - sauteed red & yellow bell pepper, one big yellow onion, sliced garlic, and 2 chopped carrots. Cooked with salt & pepper and some celery seed.
6. Noodles
7. Mixture of sauteed mushrooms with fresh chopped thyme, 12 oz. ricotta cheese, 1 big handful of grated parmesan, 2 eggs, salt & pepper. Mixed together in a bowl and poured over the noodles.
8. Noodles
9. The other half of the small can of tomato sauce spread evenly, then a layer of provolone cheese slices, then a layer of shredded mozzarella cheese and topped with a generous dusting of grated parmesan.